Friday, June 20, 2008

Bug sure looks beet...

IMG_4644
IMG_4702
IMG_4701

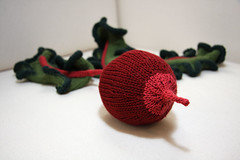
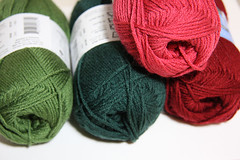
Beet by Norah Gaughan (Berroco, #274 comfort dk booklet)
Berroco Comfort DK, 50% Super Fine Nylon, 50% Super Fine Acrylic (178 yards / 50 g per ball)
0.22 balls of color 2760 "Beet Root"
0.16 balls of color 2730 "Teaberry"
0.48 balls of color 2761 "Lovage"
0.34 balls of color 2762 "Spruce"
US 3 (3.25 mm) bamboo dpns
US 5 (3.75 mm) Knitpicks Options circular needles

I recently knit Norah Gaughan's wonderful beet pattern. I'd been wanting to knit it since she previewed it on her blog back in December, but a really cute photoshoot (complete with a slew of fresh vegies) rchrispy staged for her tasty looking beet pushed me over the edge.

I used the recommended yarns:

IMG_3685.jpg

...and made only one real change to the pattern. After knitting, I threaded pipecleaners into the i-cord stems of the leaves, extending them up behind the central vein of each leaf. I then basically acted like I was starting the stem instructions again, picking up 64 stitches around the edges of the stem on the back of the leaf with the circular needle, knitting 32 stitches, and then doing the bind off as specified. This effectively concealed the pipe cleaners, which I poked several inches into the stuffing in the root part before attaching the leaves.

Unfortunately, the pipecleaners don't actually support the weight of the leaves very well, and they make the leaf vein parts of the stems look a little more bulky than might be desired, so I'm not sure if I would recommend this modification to others. If you do decide to use pipecleaners in this (or another) project, I would recommend first bending the ends back on themselves (as I did), forming a little loop, so you don't end up with sharp wires protruding from your knitting.

All in all, I think the beet came out pretty cute, and I'm almost certain that I will be making it some company in the future... maybe some carrots, a leek or green onions, and (if I can figure out how to do it) some cauliflower would be nice : )

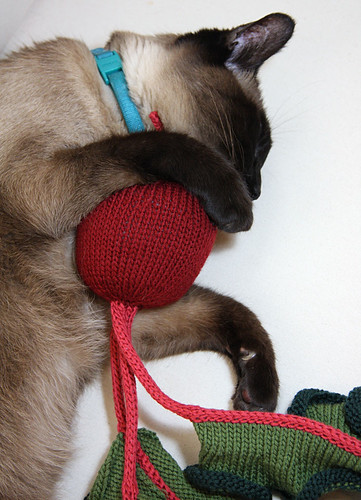
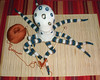
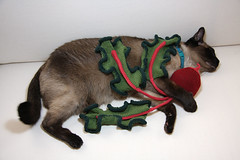
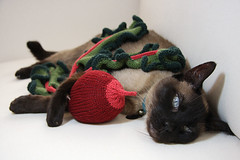
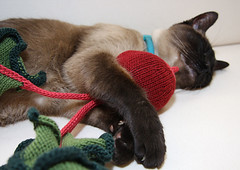
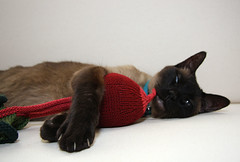
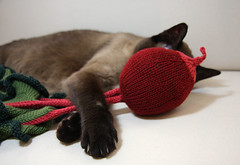
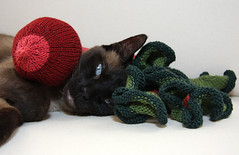
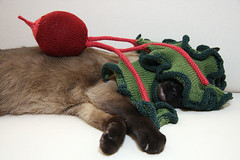
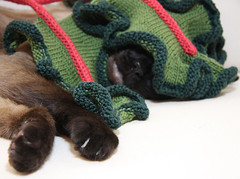
I'll have to keep an eye on the beet, though. It seems to have a soporific effect on Bug - you might say it induces a cat-atonic state, as evidenced in the following series of photos:

IMG_4646
IMG_4657
IMG_4654
IMG_4659
IMG_4726
IMG_4712
IMG_4718
IMG_4665
IMG_4668
IMG_4685
IMG_4689
IMG_4691

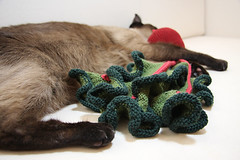
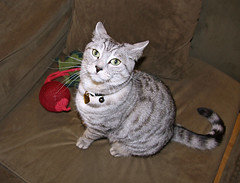
To be sure, it does not appear to have this effect on all cats. Lyla (the sweetie I'm currently cat-sitting for) clearly is not amused with the beet:

IMG_4876

...nor is she knocked out by it. Meanwhile, Moana simply wonders how it tastes....

IMG_4742

Hmmm.... It must contain a Bug-specific sedative.

IMG_4707
IMG_4705

Monday, June 9, 2008

My Unseasonably Warm Serpentine Sweater

It was 85° inside our apartment today, so of course I thought it was a perfect opportunity to take pictures of myself wearing my new sweater. Don't worry - I didn't sweat on it too horribly : )

IMG_4586
IMG_4589
IMG_4590
IMG_4593
Serpentine Sweater (A shorter version of the Serpentine Coat by Norah Gaughan from the book Knitting Nature)
Reynolds Odyssey, Merino wool (104 yards / 50 g per ball)
6.72 balls of "Brown Mix"
2 balls of "Granite Mix" (not quite enough, as it turned out*)
1.42 balls of "Sea Mix"
US 4 (3.5 mm) circular needles for yoke, body, and upper sleeves
US 3 (3.25 mm) bamboo dpns for lower sleeves
US 2.5 (3.0 mm) dpns and circular needles for sleeve cuffs, collar, and button and buttonhole bands
US 8 (5.0 mm) circular needles for lower body bind-off

As I mentioned previously, I decided to convert the pattern for knitting from the top down, imagining that I could make the sweater fit me better if I could try it on as I knit (a good idea in principle... unfortunately, as you will see, my execution was, shall we say, lacking).

First, I should mention that I really enjoyed the Odyssey yarn, which consists of 4 plies, each of which changes color independently. I'm so glad I was able to find it on sale last year! I love the colors :)

295-9534_IMG.jpg 295-9531_IMG.jpg 295-9532_IMG.jpg

After working the yoke, I realized (or rather, finally admitted) that my floats were way too loose (ahem, gauge problem alert), so I spent some time trying to tighten up the worst offenders. I laboriously shuffled the excess yarn to the edges, where I later cut it and wove the ends into the button and buttonhole band seams. There's still some extra looseness in places (and some bumpiness), but it's much more tolerable. I definitely need to work on figuring out the right amount of tension for stranded knitting....

IMG_4569

I knit the sleeves to fit me excellently (ripping out the forearm a few times on the first one to get it just right). Nothing ever goes as planned, however, as after blocking the yoke grew significantly (duh... all those loose stitches) leading the turtleneck-style collar to migrate down over my collarbones and the armpits to hang about 3 inches below where I was expecting them to be (I have some pretty impressive flying squirrel "wings" when I spread my arms). This situation, of course, caused the sleeves too be a corresponding 3 inches too long (and wider than expected - moving the part of the sleeve that was meant to fit around the meaty part of my forearm down to my wrist area, etc.) and shifted my waist and hip shaping (as well as the bottom edge of the sweater) downward.

IMG_4608
IMG_4601
IMG_4616

Clearly, my brilliant plan for perfecting the fit backfired a bit...

The upshot of all this is that what I meant to be a closely-fitted cardigan is now a relaxed, rather roomy one with cuffed sleeves. Luckily, I like it anyway :)

IMG_4597

My buttonholes ended up smaller than expected (I think they were the only things that did), so I chose 0.5 inch buttons that I thought went well with the color scheme. After the fact, I realize that more frequent button placement would have been a good idea to prevent gaping (I placed three rather close together on the collar/upper yoke, but spaced the rest about 4.5 inches apart, as the pattern suggested).

IMG_4638
IMG_4628
IMG_4622

I'm too lazy to reknit the buttonhole band (*which had the added problem of me having run out of the "Granite Mix" and having to switch to "Brown Mix" too soon), so instead I decided to try a technique I've been meaning to use on several other sweaters: lining the button and buttonhole bands with grosgrain ribbon for added stability.

IMG_4618

I think this went pretty well. I used the overcast stitch as described in TECHknitting with all-purpose sewing thread to attach the ribbon (the cut ends of which I folded toward the center (to make a point) then under twice). For the buttonhole band, I stitched the ribbon to the edge of the band first, cut a hole in the ribbon behind each buttonhole, and used the buttonhole stitch to stabilize these holes before overcast stitching the rest of the grosgrain ribbon down.

IMG_4643
IMG_4635

I didn't line the collar (I did initially, but it seemed to make the collar flop open (exposing a little more of the ribbon than I liked) when not buttoned).

IMG_4624

All in all, this sweater didn't work out (at all) as intended, but I like it!

I think the inside is pretty, too:

IMG_4564

Too bad I can't really wear it until the temperature drops considerably.... ah, well... it looks nice folded up :)

IMG_4579